Thursday, May 26, 2011

Homemade cereal milk ice cream


Once upon a time there was a, once low profile, eatery in a big fancy city that became widely popular called Momofuku.  They make delicious things, like Cereal Milk ice cream, for fabulous people.  Mmmm cartoons and cereal is one of life's most simple pleasures, made complete by slurping the cereal infused milk from the bottom of the bowl.  If only one could capture all the milky, sweet, cereal bliss in a semi-solid form. 

Momofuku did it first but I did it for you.  Here's a version to make at home and because I'm going on vacation next week, I lightened it up.  I also experienced an ethical dilemma while shopping for cereal.  I was going to make Fruity Pebble ice cream but the natural food isle called my name and I can happily report that this "natural" cereal, with no corn syrup or other crazy ingredients is good, better than Cinnamon Toast Crunch actually


Cinnamon Cereal Milk Ice Cream
Danger: special equipment required!  Ice cream maker (KitchenAid makes a killer one) or a barrel, some ice, salt, and a pioneer.

2 c. unsweetened almond milk*
2 c. cereal (you can choose whatever you'd like)  I used Mom's Best Toasted Cinnamon        
       Squares
1 c. non-fat Greek yogurt*
2 T honey
1/4 cane sugar or sweetener of choice to equal the sweetness of a 1/4 c. sugar
1/8 tsp cinnamon (omit if you choose a different cereal)
a few dashes of salt

Combine cereal and milk in a large bowl and leave unattended for 30-45 min.  You may want to drop in, stir, and eat a piece of cereal every now and then.

Place a strainer over a second bowl (big enough to catch the milk) and dump the milk and cereal into it.  Smash cereal against strainer to extract as much tasty milk as possible.  Don't throw away cereal.  There will be lots of yummy cinnamon and milk left in the original bowl so be sure to use a rubber spatula and scrap that all into the strained milk. 

In a blender or if you're fortunate, a Vitamix, place 1/3 c. of the reserved mushy cereal, the yogurt, honey, sweetener of choice, salt, cinnamon and 1/4 c. of cereal milk.  Blend until smooth, abouts 1-2 minutes.  Add the remaining cereal milk and bled until combined.

Pour mixture into your ice cream maker and follow their directions, or give it to your pioneer who will make it in a barrel.  My KitchenAid took about 24 min. of spinning and humming until it was ice cream.  Now, you can eat it all right away, which I recommend because the texture is top notch right out of the ice cream maker (of course you'd be sharing with others.)  You can also put it in an air-tight container and freeze until you're ready to eat it.  I'd advice taking it out, eh, around 15-20 min. before you want to eat/serve it, as it gets pretty hard in the freezer.  Crunch up left over cereal and sprinkle on top for extra WOW factor. Wow!

*if you are not going to Florida and prefer a richer treat, substitute the almond milk and yogurt for 2 c. milk and 1 c. of cream.  Soak it all with cereal and forget about reserving mushy cereal to blend with it.  Strain as instructed then blend with honey, sugar, etc.


Thursday, February 3, 2011

Chocolate Oatmeal cookies

"I wish we had some cookies or a cake"
"Do you want me to make something?"
"No, that's ok."
"Are you sure?"
"Yeah, don't worry about it."
30 minutes later "So, are you going to make some cookies?"
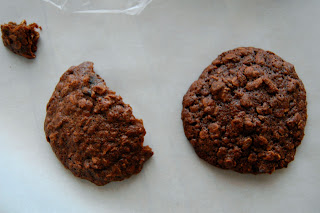
And the chocolate oatmeal cookies were born.

Chocolate oatmeal cookies
  • 3/4 c. whole wheat pastry flour
  • 1/4 c. cocoa powder
  • 1 c. rolled oats
  • 1 tsp salt
  • 1/4 tsp cinnamon
  • 1 egg + 1 egg white
  • 3/4 c. natural can sugar
  • 3 T. melted butter
  • 1/4 c. maple syrup
  • 1 tsp vanilla extract
  • 1/2 c. chopped figs or other dried fruit
Preheat oven to 350 degrees.  Combine first five ingredients in a bowl and set aside.  Combine eggs and sugar in the bowl of a mixer and beat until light and foamy.  Measure vanilla into melted butter then slowly add melted butter to eggs and sugar with mixer on low.  Stop mixer, scrap down sides and bottom of bowl, then add the maple syrup.  Mix lightly to incorporate syrup.  Add the dry ingredients to the mixing bowl, along with the figs and mix just until combined.  Chill dough for at least 30 minutes, then scoop onto cookies sheets leaving a few inches between cookies.  Bake for 7 minutes, rotate pans and bake an additional 7-8 minutes.  Remove from the oven, transfer cookies to cooling racks and cool until you cannot resist the temptation, even though you might burn up your mouth.


Thursday, December 9, 2010

Carpe Diem Cooking: Arugula Gimlet

I often find wonderful recipes but then for some reason I never make them at home.  No more!  My early New Year's resolution is to make those amazing creations when I find them.  It's silly not to create a priceless experience when the step by step directions lie in front of me.  I won't wait for a special occasion, or any occasion......carpe diem.
This recipe is my first act of carpe diem cooking/drinking.  I found it in Bon Appetite.


Thank you Matthew Biancaniello
The Roquette
makes 2
1 c. loosely packed arugula
4 1/2 tsp dark agave syrup
4 1/2 tsp fresh squeezed lime juice
1/2 c. Hendricks Gin
ice

Muddle arugula, agave and lime juice in a cocktail shaker until arugula has wilted.  Do this for a least a minute (it's well worth it.)  Add gin, and ice and shake until chilled (pretend you're Tom Cruise in Cocktail for added enjoyment.)  Strain into rocks glass filled with cubes and garnish with extra arugula, if you wish.  
I personally enjoyed this drink up, but to each his own.

*recipe and directions can be found in Sept. 2010 issue of Bon Appetite.  The directions seen here are not word for word but the measurements are.  Enjoy!


Saturday, November 20, 2010

Cabin fever

With winter around the corner, cabin fever will be setting in very soon.  Thanks to our good friends at The Village Idiot I have had the pleasure of tasting Cabin Fever Maple Whiskey, which leaves me thankful for the change of seasons, crunchy leaves and chilly nights.  A perfect excuse for drinking at breakfast.

Monday, November 15, 2010

Thanksgiving: Sweet potato pie


 God, how do we eat pie after Thanksgiving dinner?  We seem to conjure up eating super powers that enable us to ingest large quantities of a variety of food and still look at pie with gleaming eyes.  Pie eating is part of the great American tradition of over stuffing ourselves just as the Pilgrims would have done.  Pumpkin pie is the standard but why not offer sweet potato pie as well.  Why stop at one pie......really.

Sweet Potato Pie  
  • pie dough (recipe not included.  Most people seem to have their own personal favorite recipe.)
  • 2 medium or 1 large sweet potato (2 cups worth of potato)
  • 1/2 c. cane sugar
  • 1/2 c. sucanot
  • 1 tsp cinnamon
  • 1/4 tsp all spice
  • 1/4 tsp salt
  • 1 tsp vanilla extract
  • 2 eggs + 1 egg white + 1 egg for crust
  • 1/2 cup skim milk (if you would like to make this dairy free, use Silk soy creamer)
  • 1/2 cup almond milk
  • 1 T cornstrach
Wash the sweet potatoes, dry, and wrap in foil. Place the potatoes in a 400 degree oven and bake until soft (test by piercing with a knife.) When potatoes are done, remove from the oven, unwrap and allow to cool. Reduce the oven temperature to 375 degrees.

While potatoes cool, roll out our your pie dough and place into a 8" pie plate. Finish the top edge so it looks pretty and then put it in the refrigerator while you make the filling.
Remove the flesh of the potatoes from the skin and measure out 2 cups of potato. Place potato in a food processor along with sugars, spices, and vanilla and process until smooth. Scrape down the sides of the food processor at some point to make sure it all gets combined. Now, add and eggs and process for 1 minute. Next, add the milk and almond milk and pulse until combined. Finally, add the cornstarch and process for just about 30 seconds. Whisk the remaining egg and brush over edges of the crust.  Pour the filling into the prepared crust.

Place pie in the oven and bake for about an hour or until set but slightly jiggly in the center. You will likely have to loosely cover the pie with foil after the first 30 minutes to prevent the crust from burning.
Allow pie to cool before cutting.

Thursday, November 11, 2010

Chocolate Pumpkin Ale Cake

What is a girl to do with an open can of pumpkin puree and half of a six pack of Saranac's Pumpkin Ale?  Bake a cake, naturally.  Stout cake is my favorite cake of all time and it's fall and I adore pumpkin, so you see how this came about.  It turned out even better than I had imagined though not as pumpkiny as I had anticipated.  It's more like an ultra moist chocolate cake with hints of fall.
chocolate pumpkin ale cake
2 c. Pumpkin Ale
1 c. unsalted butter
1 1/2 c. cocoa powder

2 c. unbleached flour
2 c. whole wheat pastry flour
1 T baking soda
1 1/2 tsp salt
1 tsp cinnamon
1/4 tsp nutmeg

2 eggs
4 egg whites
2 c. natural cane sugar
2c. sucanot
2 1/2 c. pumpkin puree

cream cheese frosting.......if you need a recipe just ask, otherwise I don't feel like writing it

Grease/oil and flour 2 deep 8" round pans or two standard 9" pans.  Preheat oven to 350 degrees.

Simmer beer and butter in a small saucepan over medium heat until butter has melted.  Then dump the cocoa powder into the beer and butter, and whisk until smooth.  Remove from the heat and allow to cool.

Combine all dry ingredients and set aside.

Beat eggs and egg whites until bubbles start hanging out on top.  Next add the sugars and beat on med. high until thick and light colored.  Next add the pumpkin puree and mix on low just until incorporated.  Now, add a bit of the beer mixture and mix on low (this will warm up the eggs so that they won't scramble as they would if you just dumped the whole thing in at one time.)  Begin adding beer, slowly, to the egg/pumpkin mixture until it's all one color.  It's time to add the dry ingredients.  Stop the mixer and carefully toss in the dry ingredients.  Mix on low until flour is mostly combined, stop the mixer and scrape the sides and bottom of the bowl, then increase the speed and mix vigourously for 20 seconds(ish). 

Pour batter into prepared pans, and place in the preheated oven.  Bake for 35ish minutes or until tooth pick inserted in the center of the cake comes out clean.  Try not to open the oven until the 20 minute mark.  Surely, the cake shouldn't be done until 30 min. at the least.  Check at 35 and bake further if needed.  When the sides of the cake pull away from the pan, that's another clue that it's done.  It should also bounce back when poked in the center.  Cool for about 12 min. then remove from pans onto a cooling rack.  Once the cake is cool, not just "it doesn't burn my mouth or my hands while I eat it" cool, but cool to the touch, which might take, ugh, a few hours (best to chill in fridge for a bit if you are short on time) frost, bring to room temp. and serve.  I opted for the rustic, middle and top but no side frosting look.  Good idea for this cake so that you don't overshadow the cake with frosting.